Python 开发环境 Jllin 发布于 2019-01-19 收录于 Developmentpython开发环境 1 2 3 4 5 6 7 8 git clone https://github.com/pyenv/pyenv-virtualenv.git $(pyenv root)/plugins/pyenv-virtualenv echo 'eval "$(pyenv virtualenv-init -)"' >> ~/.bash_profile echo 'eval "$(pyenv virtualenv-init -)"' >> ~/.zshenv exec "$SHELL" pyenv virtualenv 3.6.9 ops-drf-env-3.6.9 pyenv activate ops-drf-env-3.6.9 pip install Django==1.11 pip install MySQLdb
齐治堡垒机Shterm Api Python调用示例 Jllin 发布于 2019-01-11 收录于 Python Development通过接口管理shterm 以下是示例代码,可根据接口文档进行编写自己的管理代码。
魔方网表api记录 Jllin 发布于 2018-11-28 收录于 Operations魔方网表API接口记录 1 2 3 /s/json/{spaceId}/forms/{formId}?selector={selector} ##label就是名字,name就是字段id /s/json/{spaceId}/forms/{formId}/records/feed和/s/json/{spaceId}/forms/{formId}/records/feed?{query} ##是记录列表的JSON接口 /s/json/{spaceId}/forms/{formId}/records/{recordId} ##单条记录的JSON接口
Pycharm Set Jllin 发布于 2018-11-22 收录于 Python文件信息配置 打开pycharm,选择File-Settings 选择Editor–Color&Style–File and Templates–Python-Script 1 2 3 4 5 6 7 ##!/usr/bin/python3 # -*- coding: utf-8 -*- # @Time : ${DATE} ${TIME} # @Author : lin.chen # @Email : it@mulinux.com # @File : ${NAME}.py # @Software: ${PRODUCT_NAME}
Deepin安装使用KVM Jllin 发布于 2018-11-21 收录于 Operations安装 1 2 3 sudo apt-get install kvm qtemu ##安装kvm和qt前端 apt install qemu-kvm libvirt-clients qemu-utils libvirt-daemon-system # deepin 15.8 sudo apt-get install qemu-system #deepin 15.8 卸载 1 2 sudo apt-get remove kvm qtemu ##卸载kvm和qt前端 apt-get install libvirt-bin virt-manager ##工作常用工具 ovf to qcow2 1 2 sudo apt-get install qemu-utils qemu-img convert -O qcow2 input.vmdk output.qcow2
Docker镜像管理 Jllin 发布于 2018-10-16 收录于 Operations安装docker 1 2 3 4 5 6 7 8 9 Centos6.6_x64 [root@web1 ~]# uname -a Linux web1.mulinux.com 2.6.32-504.el6.x86_64 #1 SMP Wed Oct 15 04:27:16 UTC 2014 x86_64 x86_64 x86_64 GNU/Linux [root@web1 ~]# yum install -y epel-release [root@web1 ~]# yum install -y docker-io [root@web1 ~]# /etc/init.d/docker start [root@web1 ~]# ps aux | grep docker root 1591 1.0 1.4 287656 14224 pts/0 Sl 18:30 0:00 /usr/bin/docker -d root 1709 0.0 0.0 103244 864 pts/0 S+ 18:31 0:00 grep docker 镜像管理 1 2 3 4 5 6 7 8 9 10 11 12 13 14 15 16 17 18 19 20 21 22 23 24 25 26 27 28 29 30 31 32 33 34 35 36 37 38 39 40 41 42 43 44 45 46 [root@web1 ~]# docker pull centos latest: Pulling from centos 47d44cb6f252: Pull complete 6fdebd7b0eb5: Pull complete a63aae4d216f: Pull complete bb3d629a7cbc: Pull complete Digest: sha256:381f21e4c7b3724c6f420b2bcfa6e13e47ed155192869a2a04fa10f944c78476 Status: Downloaded newer image for centos:latest [root@web1 ~]# docker images REPOSITORY TAG IMAGE ID CREATED VIRTUAL SIZE centos latest bb3d629a7cbc 2 weeks ago 196.6 MB [root@web1 ~]# docker tag centos mulinux123 [root@web1 ~]# docker images REPOSITORY TAG IMAGE ID CREATED VIRTUAL SIZE centos latest bb3d629a7cbc 2 weeks ago 196.6 MB mulinux123 latest bb3d629a7cbc 2 weeks ago 196.6 MB [root@web1 ~]# docker run -it centos /bin/bash #用镜像开启容器 [root@32c67b2b18e0 /]# w 12:30:01 up 2:09, 0 users, load average: 0.06, 0.01, 0.00 USER TTY FROM LOGIN@ IDLE JCPU PCPU WHAT [root@32c67b2b18e0 /]# exit exit [root@web1 ~]# docker ps #查看运行的容器 [root@web1 ~]# docker ps -a #可以查看到没有运行的容器 CONTAINER ID IMAGE COMMAND CREATED STATUS PORTS NAMES 32c67b2b18e0 centos "/bin/bash" 2 minutes ago Exited (0) About a minute ago modest_kowalevski [root@web1 ~]# docker images REPOSITORY TAG IMAGE ID CREATED VIRTUAL SIZE centos latest bb3d629a7cbc 2 weeks ago 196.6 MB mulinux123 latest bb3d629a7cbc 2 weeks ago 196.6 MB [root@web1 ~]# docker rmi bb3d629a7cbc #删除ID会导致同id的所有都删除 [root@web1 ~]# docker rmi mulinux123 Untagged: mulinux123:latest [root@web1 ~]# docker images REPOSITORY TAG IMAGE ID CREATED VIRTUAL SIZE centos latest bb3d629a7cbc 2 weeks ago 196.6 MB [root@web1 ~]# docker tag centos centos:mulinux [root@web1 ~]# docker images REPOSITORY TAG IMAGE ID CREATED VIRTUAL SIZE centos latest bb3d629a7cbc 2 weeks ago 196.6 MB centos mulinux bb3d629a7cbc 2 weeks ago 196.6 MB [root@web1 ~]# docker rmi centos:mulinux Untagged: centos:mulinux [root@web1 ~]# docker images REPOSITORY TAG IMAGE ID CREATED VIRTUAL SIZE centos latest bb3d629a7cbc 2 weeks ago 196.6 MB
CentOS6/7开启nested嵌套虚拟化 Jllin 发布于 2018-10-06 收录于 Operations启用nested CentOS6 升级系统内核到Linux 3.X版本 rpm -ivh kernel-ml-3.18.3-1.el6.elrepo.x86_64.rpm 修改grub.conf vi /etc/grub.conf 将default=1改为default=0;且在 kernel 那一行的末端加上 “kvm-intel.nested=1”
Use Lvs Jllin 发布于 2018-09-17 收录于 Operations参考 http://kb.linuxvirtualserver.org/images/c/c8/LVS%E6%93%8D%E4%BD%9C%E6%89%8B%E5%86%8C.zip http://github.com/alibaba/LVS
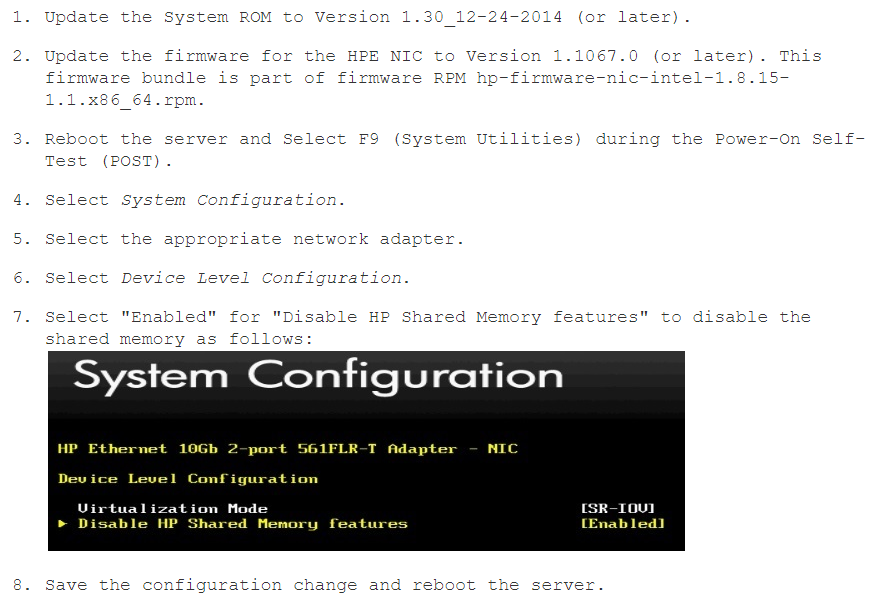
HPGen9做万兆网卡直通时报错 Jllin 发布于 2018-08-18 收录于 Operationsvi /etc/grub2.cnf 1 2 在内核那一行添加”intel_iommu=on“ 重启后检查:cat /proc/cmdline | grep iommu dmesg|grep -e DMAR -e IOMMU 1 报错:vfio-pci 0000:04:00.3: Device is ineligible for IOMMU domain attach due to platform RMRR requirement. Contact your platform vendor. 根据报错在hp论坛查找到该错误信息 1 2 3 4 5 https://support.hpe.com/hpsc/doc/public/display?sp4ts.oid=7271259&docId=emr_na-c04781229&docLocale=en_US https://community.hpe.com/t5/ProLiant-Servers-ML-DL-SL/Device-is-ineligible-for-IOMMU-domain-attach-due-to-platform/td-p/6751904 通过lspci -vvv | grep Ethernet可以查看到网卡的具体型号 解决方案: