Ansible概述
IT自动化的好处
团队影响
节省时间,提高工作效率
消除重复任务
更少的错误风险
改善协作和工作满意度
企业影响
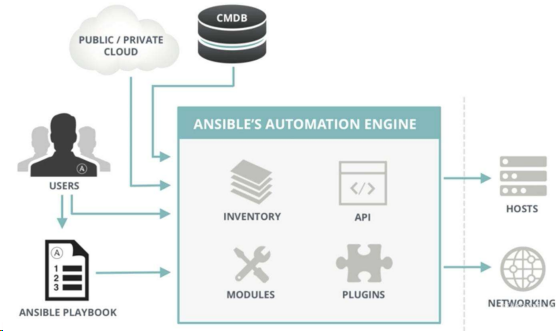
Ansible是什么
Ansible是一种IT自动化工具。它可以配置系统,部署软件以及协调更高级的IT任务,例如持续部署,滚动更新。Ansible适用于管理企业IT基础设施,从具有少数主机的小规模到数千个实例的企业环境。Ansible也是一种简单的自动化语言,可以完美地描述IT应用程序基础结构。
Ansible架构
先来认识一下Ansible
Ansible安装与配置
Ansible使用要求
服务端要求
Python2.6/2.7/3.x
RedHat,Debian,CentOS,OS X等。不支持Windows
被管理端要求
OpenSSH
Python2.6/2.7/3.x
安装Ansible
配置文件
 1
 2
 3
 4
 5
 6
 7
 8
 9
10
# vi /etc/ansible/ansible.cfg
[ defaults ]
inventory = / etc / ansible / hosts
forks = 5
become = root
remote_port = 22
host_key_checking = False
timeout = 10
log_path = / var / log / ansible . log
private_key_file = / root /. ssh / id_rsa
Inventory(主机清单)
 1
 2
 3
 4
 5
 6
 7
 8
 9
10
11
12
13
14
15
16
17
18
19
20
21
# 示例1:未分组的主机
green.example.com
blue.example.com
192.168.100.1
192.168.100.10

# 示例2:属于webservers组主机集合
[webservers]
alpha.example.org
beta.example.org
192.168.1.100
192.168.1.110
www[001:006].example.com

示例3:属于dbservers组主机集合
[dbservers]
db01.intranet.mydomain.net
db02.intranet.mydomain.net
10.25.1.56
10.25.1.57
db-[99:101]-node.example.com
主机和主机组变量:
1
2
3
4
5
6
7
[ webservers ]
192.168 . 1.10 ansible_ssh_user = root ansible_ssh_pass = '123456’ http_port=80
192.168 . 1.11 ansible_ssh_user = root ansible_ssh_pass = '123456’ http_port=80
[ webservers : vars ]
http_port = 8080
server_name = www . ctnrs . com
组变量分解到单个文件:
1
2
3
# cat /etc/ansible/group_vars/webservers.yml
http_port : 8080
server_name : www . ctnrs . com
ad-hoc命令
命令行工具常用选项
 1
 2
 3
 4
 5
 6
 7
 8
 9
10
11
12
13
14
15
16
17
18
19
20
21
22
23
24
25
26
格式: ansible < host - pattern > [ options ]
选项:
- a MODULE_ARGS , -- args = MODULE_ARGS 模块参数
- C , -- check 运行检查,不执行任何操作
- e EXTRA_VARS , -- extra - vars = EXTRA_VARS 设置附加变量 key = value
- f FORKS , -- forks = FORKS 指定并行进程数量,默认 5
- i INVENTORY , -- inventory = INVENTORY 指定主机清单文件路径
-- list - hosts 输出匹配的主机列表,不执行任何操作
- m MODULE_NAME , -- module - name = MODULE_NAME 执行的模块名,默认 command
-- syntax - check 语法检查 playbook文件 ,不执行任何操作
- t TREE , -- tree = TREE 将日志输出到此目录
- v , -- verbose 详细信息, - vvv更多 , - vvvv debug
-- version 查看程序版本
连接选项:控制谁连接主机和如何连接
- k , -- ask - pass 请求连接密码
-- private - key = PRIVATE_KEY_FILE , -- key - file = PRIVATE_KEY_FILE 私钥文件
- u REMOTE_USER , -- user = REMOTE_USER 连接用户,默认 None
- T TIMEOUT , -- timeout = TIMEOUT 覆盖连接超时时间,默认 10 秒
提权选项:控制在目标主机以什么用户身份运行
- b , -- become 以另一个用户身份操作
-- become - method = BECOME_METHOD 提权方法,默认 sudo
-- become - user = BECOME_USER 提权后的用户身份,默认 root
- K , -- ask - become - pass 提权密码
SSH密码认证
1
2
3
[webservers]
192.168.1.10:22 ansible_ssh_user=root ansible_ssh_pass=’123456’
192.168.1.11:22 ansible_ssh_user=root ansible_ssh_pass=’123456’
SSH秘钥对认证
1
2
3
[webservers]
192.168.1.10:22 ansible_ssh_user=root ansible_ssh_key=/root/.ssh/id_rsa
192.168.1.11:22 ansible_ssh_user=root
Ansible常用模块
执行shell命令(command和shell)
文件传输(copy和file)
管理软件包(yum)
用户和组(user)
从源代码管理系统部署(git)
管理服务(service)
收集目标主机信息(setup)
模块文档:https://docs.ansible.com/ansible/latest/user_guide/intro_adhoc.html
Playbook基本使用
使用Playbook的好处
特点
易读的编排语言
适合配置管理和应用部署
非常适合部署复杂的工作
Playbook文档:https://docs.ansible.com/ansible/latest/user_guide/playbooks.html
先来认识一下Playbook
自动部署Nginx
 1
 2
 3
 4
 5
 6
 7
 8
 9
10
11
12
13
14
15
16
17
18
19
20
21
22
23
24
25
26
27
28
29
30
31
32
# main.yml
---
- hosts : webservers
vars :
hello : Ansible
tasks :
- name : Add repo
yum_repository :
name : nginx
description : nginx repo
baseurl : http : // nginx . org / packages / centos / 7 /$ basearch /
gpgcheck : no
enabled : 1
- name : Install nginx
yum :
name : nginx
state : latest
- name : Copy nginx configuration file
copy :
src : ./ site . conf
dest : / etc / nginx / conf . d / site . conf
- name : Start nginx
service :
name : nginx
state : started
- name : Create wwwroot directory
file :
dest : / var / www / html
state : directory
- name : Create test page index . html
shell : echo "hello {{hello}}" > / var / www / html / index . html
1
2
3
4
5
6
7
8
9
# site.conf
server {
listen 80 ;
server_name www . ctnrs . com ;
location / {
root / var / www / html ;
index index . html ;
}
}
执行playbook:ansible-playbook main.yaml
YAML语法
缩进表示层级关系
不支持制表符“tab”缩进,使用空格缩进
通常开头缩进 2 个空格
字符后缩进 1 个空格,如冒号、逗号等
“—” 表示YAML格式,一个文件的开始
“#“注释
Playbook文件结构
 1
 2
 3
 4
 5
 6
 7
 8
 9
10
11
12
13
14
15
16
17
18
---
- name : play1
hosts : webservers
remote_user : root
vars :
var_name : value
tasks :
- name : echo
shell : "echo {{var_name}}"
- name : play2
hosts : webservers
remote_user : root
vars :
var_name : value
tasks :
- name : echo
shell : "echo {{var_name}}"
1
2
3
4
5
6
7
8
---
- hosts : webservers
remote_user : root
vars :
var_name : value
tasks :
- name : echo
shell : "echo {{var_name}}"
在变更时执行操作(handlers)
notify:在任务结束时触发
handlers:由特定条件触发Tasks
 1
 2
 3
 4
 5
 6
 7
 8
 9
10
11
12
13
14
15
---
hosts : webservers
gather_facts : no
tasks :
- name : Copy nginx configuration file
copy :
src : ./ site . conf
dest : / etc / nginx / conf . d / site . conf
notify :
- restart nginx
handlers :
- name : restart nginx
service : name = nginx state = reloaded
 1
 2
 3
 4
 5
 6
 7
 8
 9
10
11
12
13
14
15
16
---
- hosts: webservers
  gather_facts: no

  tasks:
    - name: Install redis
      yum: name=redis state=present
      tags: install

    - name: Copy redis configuration file
      copy: src=redis.conf dest=/etc/redis/redis.conf
      tags: configuration

    - name: Restart redis
      service: name=redis state=restarted
      tags: restart
指定:ansible-playbook examply.yml –tags “configuration,install”
跳过:ansible-playbook examply.yml –skip-tags “install”
Playbook文件调试
语法检查:ansible-playbook main.yml –syntax-check
 1
 2
 3
 4
 5
 6
 7
 8
 9
10
打印语句:
---
- hosts: webservers
  tasks:
    - debug:
      msg: {{group_names}}
    - debug:
      msg: {{inventory_hostname}}
    - debug:
      msg: {{ansible_hostname}}
案例:自动部署Tomcat
 1
 2
 3
 4
 5
 6
 7
 8
 9
10
11
12
13
14
15
16
17
18
19
20
21
22
23
24
25
---
hosts : webservers
gather_facts : no
vars :
tomcat_version : 8.5 . 34
tomcat_install_dir : / usr / local
tasks :
- name : Install jdk1 . 8
yum : name = java - 1.8 . 0 - openjdk state = present
- name : Download tomcat
get_url : url = http : // mirrors . hust . edu . cn / apache / tomcat / tomcat - 8 / v {{ tomcat_version }} / bin /
apache - tomcat - {{ tomcat_version }} . tar . gz dest =/ tmp
- name : Unarchive tomcat - {{ tomcat_version }} . tar . gz
unarchive :
src : / tmp / apache - tomcat - {{ tomcat_version }} . tar . gz
dest : "{{ tomcat_install_dir }}"
copy : no
- name : Start tomcat
shell : cd {{ tomcat_install_dir }} &&
mv apache - tomcat - {{ tomcat_version }} tomcat8 &&
cd tomcat8 / bin && nohup ./ startup . sh &
Playbook定义变量与使用
命令行
在Inventory中定义
在Playbook中定义
 1
 2
 3
 4
 5
 6
 7
 8
 9
10
# 在Playbook中定义变量
---
hosts : webservers
gather_facts : no
vars :
var_name : value
var_name : value
tasks :
- name : hello
shell : "echo {{var_name}}"
在Role中定义
注册变量(register)
 1
 2
 3
 4
 5
 6
 7
 8
 9
10
# 注册变量
---
hosts: webservers
  gather_facts: no
  tasks:
    - name: Get date
      command: date +"%F_%T"
      register: date_output
    - name: Echo date_output
      command: touch /tmp/{{date_output.stdout}}
系统信息变量(facts)
1
2
3
4
5
6
#  系统变量
---
hosts: webservers
  tasks:
    - name: Get hostname
      debug: msg={{ansible_hostname}}
Playbook文件复用
include & import 区别
1
2
3
4
5
6
7
include*(动态):在运行时导入
* --list-tags,--list-tasks不会显示到输出
* 不能使用notify触发来自include*内处理程序名称(handlers)

import*(静态):在Playbook解析时预先导入
* 不能与循环一起使用
* 将变量用于目标文件或角色名称时,不能使用inventory(主机/主机组等)中的变量
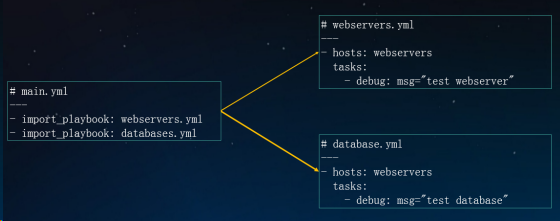
import_playbook
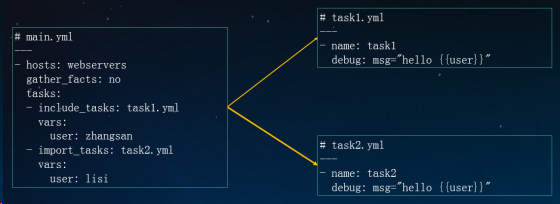
includetasks & importtasks
Playbook流程控制
条件
1
2
3
4
5
6
- hosts: webservers

  tasks:
    - name: Host 192.168.1.12  run this task
      debug: msg="{{ansible_default_ipv4.address}}"
      when: ansible_default_ipv4.address == '192.168.1.12 '
 1
 2
 3
 4
 5
 6
 7
 8
 9
10
11
12
13
14
15
16
17
18
19
- hosts: webservers

  tasks:
    - name: Update apache version - yum
      yum: name=httpd state=present
      when: ansible_pkg_mgr == 'yum'
      notify: restart httpd

    - name: Update apache version - apt
      apt: name=apache2 state=present update_cache=yes
      when: ansible_pkg_mgr == 'apt'
      notify: restart apache2

  handlers:
    - name: restart httpd
      service: name=httpd state=restared
 handlers:
    - name: restart apache2
      service: name=apache2 state=restared
1
2
3
4
5
tasks:
  - name: "shut down CentOS 6 and Debian 7 systems"
    command: /sbin/shutdown -t now
    when: (ansible_distribution == "CentOS" and ansible_distribution_major_version == "6") or
          (ansible_distribution == "Debian" and ansible_distribution_major_version == "7")
1
2
3
4
5
6
tasks:
  - name: "shut down CentOS 6 systems"
    command: /sbin/shutdown -t now
    when:
      - ansible_distribution == "CentOS"
      - ansible_distribution_major_version == "6"
循环
 1
 2
 3
 4
 5
 6
 7
 8
 9
10
11
12
13
- name: with_list
  debug:
    msg: "{{ item }}"
  with_list:
    - one
    - two

- name: with_list -> loop
  debug:
    msg: "{{ item }}"
  loop:
    - one
    - two
1
2
3
4
5
6
7
8
9
- name: with_items
  debug:
    msg: "{{ item }}"
  with_items: "{{ items }}"

- name: with_items -> loop
  debug:
    msg: "{{ item }}"
  loop: "{{ items|flatten(levels=1) }}"
Playbook模板(jinja2)
条件和循环
1
2
3
4
5
6
7
8
# test.yml
---
- hosts : webservers
vars :
hello : Ansible
tasks :
- template : src = f . j2 dest =/ tmp / f . j2
 1
 2
 3
 4
 5
 6
 7
 8
 9
10
11
12
13
14
# f.j2
{% set list=['one', 'two', 'three'] %}

{% for i in list %}
   {% if i == 'two' %}
       -> two
   {% elif loop.index == 3 %}
       -> 3
   {% else %}
       {{i}}
   {% endif %}
{% endfor %}

{{ hello }}
1
2
3
4
{% set dict={'zhangsan': '26', 'lisi': '25'} %}
{% for key, value in dict.iteritems() %}
    {{key}} -> {{value}}
{% endfor %}
案例:管理Nginx配置文件
 1
 2
 3
 4
 5
 6
 7
 8
 9
10
11
12
13
14
15
16
# main.yml
---
- hosts : webservers
gather_facts : no
vars :
http_port : 80
server_name : www . ctnrs . com
tasks :
- name : Copy nginx configuration file
template : src = site . conf . j2 dest =/ etc / nginx / conf . d / www . ctnrs . com . conf
notify : reload nginx
handlers :
- name : reload nginx
service : name = nginx state = reloaded
 1
 2
 3
 4
 5
 6
 7
 8
 9
10
11
12
13
14
15
# site.conf.j2
{% set list=[10, 12, 13, 25, 31] %}
upstream {{server_name}} {
    {% for i in list %}
       server 192.168.1.{{i}}:80;
    {% endfor %}
}
server {
    listen       {{ http_port }};
    server_name  {{ server_name }};

    location / {
        proxy_pass http://{{server_name}};
    }
}
角色(roles)
Roles目录结构
 1
 2
 3
 4
 5
 6
 7
 8
 9
10
11
12
13
14
15
16
17
18
site . yml
webservers . yml
fooservers . yml
roles /
common /
tasks /
handlers /
files /
templates /
vars /
defaults /
meta /
webservers /
files /
templates /
tasks /
handlers /
vars /
tasks - 包含角色要执行的主要任务列表
handlers - 包含角色使用的处理程序
defaults - 角色默认的变量
vars - 角色其他的变量
files - 角色部署时用到的文件
templates - 角色部署时用到的模板
meta - 角色定义的一些元数据
Roles基本使用
1
2
3
4
5
6
---
- hosts: webservers
  roles:
     - common
     - nginx
     - php
 1
 2
 3
 4
 5
 6
 7
 8
 9
10
11
12
---
- hosts : webservers
roles :
- common
- role : nginx
vars :
dir : '/opt/a'
app_port : 5000
- role : php
vars :
dir : '/opt/b'
app_port : 5001
1
2
3
4
5
6
7
8
9
---
- hosts: webservers
  roles:
    - role: common
      tags: ["common"]
    - role: nginx
      tags: ["nginx"]
    - role: php
      tags: ["php"]
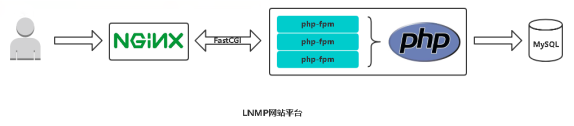
案例:部署Web服务器
参考文档
最佳实践:https://docs.ansible.com/ansible/latest/userguide/playbooksbest_practices.html
示例参考:https://github.com/ansible/ansible-examples